Add ConnectionString in Code

January 12, 2013 at 6:06 PMNasif

If you tried to add connection string in code by attempting

ConfigurationManager.ConnectionStrings.Add(...)

you get an exception telling you ConnectionStrings collection is read only.

Here is a way to get past that restriction using reflection:

const string DbConnectionName = "MyConnection";			

if (null == ConfigurationManager.ConnectionStrings[DbConnectionName])
{
	lock (ConfigurationManager.ConnectionStrings)
	{
		if (null == ConfigurationManager.ConnectionStrings[DbConnectionName])
		{
			//Force ConnectionStrings collection to be writeable
			var field = typeof(ConfigurationElementCollection).GetField("bReadOnly", BindingFlags.Instance | BindingFlags.NonPublic);
			field.SetValue(ConfigurationManager.ConnectionStrings, false);

			//Create new connection string instance
			var connection = new ConnectionStringSettings();
			connection.Name = DbConnectionName;
			connection.ConnectionString = "Server=myServer;Database=myDb;Uid=myUser;Pwd=myPass;charset=utf8;";
			connection.ProviderName = "MySql.Data.MySqlClient";

			//Add
			ConfigurationManager.ConnectionStrings.Add(connection);
		}
	}
}

In the above example DbConnectionName is a default connection that is expected to be in the ConnectionStrings, if its not there, then we create a new connection string and add it to the ConnectionStrings collection. Lock ensures that the operation is thread-safe. Example shows a MySQL connection string with MySQL provider. Change it to your specific provider and database server.

As for the question, why would anyone want to add connection string in code, when you can do it very easily in app/web.config which is standard best practice (not to mention doing it in code adds hard coded values for db)? Well, it depends to specific need. I have used the above approach in test cases when a database connection in needed while testing compatibility with different types of databases for EntityFramework (for that matter any ORM). I am sure there are many other uses as well.

Posted in: .Net | C#

Tags: , , ,

Parsing INI in .Net : IniFile Class

June 1, 2012 at 12:43 AMNasif

Few days ago I needed INI file parser. One that lets me group standard ini file sections and add/update key-values. After googling quite a bit, the only solution that I found was called "IniFileParser"  from google code. I does work, but throws exception when you have an ini file that has valueless keys. It also seemed quite large (ini parsing should be very simple!)

So, sat down and wrote a simple class that can do the job. Parses ini file, allows easy access of sections and keys with indexer. Total of 200 or so lines (with comments), i.e very small footprint.

You can download the Source from here: IniFile.zip (2.63 kb)

Example of Supported INI File Format

;Supported commets are '#' and ';'
#this is also a comment

#following is example of sectionless key value
mykey=myvalue

[mysection]
anotherkey = anothervalue

[anothersection]
ValueLessKey
aKey                =  long            long               value

How to use:

var iniFile = new IniFile();
iniFile.LoadFile("myinifile.ini");
iniFile["mysection"]["anotherkey"] = "a new value";

//Add a new key and value in a new section
iniFile["myNewSection"]["myNewKey"] = "my new value";

//Add a valueless key
iniFile["mysection"]["ValueLessKey"] = null;

//To check if a key exists (useful for valueless key), use Dictionary.ContainsKey method
iniFile["mysection"].ContainsKey("mykey");

//To access/add sectionless key/values use string.Empty as the key
iniFile[string.Empty]["sectionlessKey"] = "a value";

//Retrieve INI content for saving as ini file
File.WriteAllText("myIniFile.ini", iniFile.Ini);

//If you have ini content already, you can pass the content without reloading the file
string iniContent = File.ReadAllText("myIniFile.ini");

//Now create the IniFile instance
var iniFile = new IniFile(iniContent);

Other Specifications:

  • Key and Value must be within the same line. Multi line values are not supported.
  • Removes empty more than 1 lines within a section; allows only 1 empty line per section. Only the first empty line within the section is kept.
  • Only '#' and ';' characters are treated as comments.
  • Allows only "key = value" syntax pattern.
  • Whitespaces in both key and value are disregarded.

IniFile.zip (2.63 kb)

Posted in:

Tags: , ,

Experimenting with Windows Azure : Day 1

April 1, 2012 at 2:20 AMNasif


So this is my day 1 with Windows Azure. Goal is to move an existing LAMP based site to Windows Azure. To that end, I will have to run PHP and mySQL in Windows Azure.

I am going to start from very basic, all the day down from a Hello World. Then gradually move myself up to full blown PHP and mySQL Windows Azure site. To get started, I have already installed Window Azure SDK.

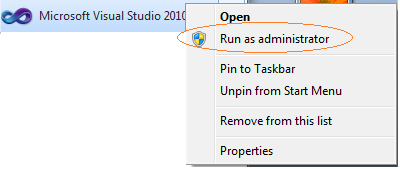
0. Start Visual Studio in Administrator mode (right click on Visual Studio icon, and select "Run As Administrator")

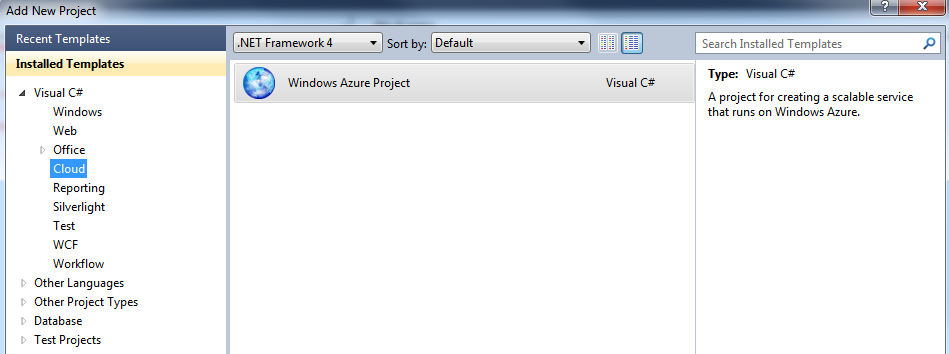
1. Create solution from Visual Studio by selected "Cloud->Windows Azure Project" from installed templates


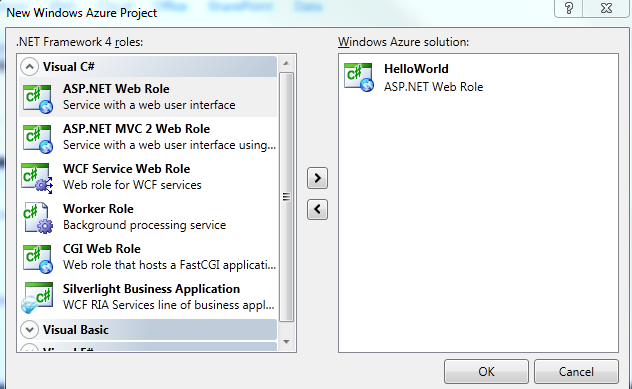
2. Select WebRole. Rename it as necessary.


3. Once your solution opens, just Run it (F5). You should see your first Windows Azure start up. It will open up default ASP.Net page in a browser window.

4. At the same time when you started to Run your solution, Visual Studio should have started Windows Azure Compute Emulator. You can access it from your Notification Area; look for azure Windows logo as shown on the picture below. Right click on it and select "Show Compute Emulator UI".


Fixing Debug Build Error:

In your first build, if you get error, it will most likely be something like below:

Windows Azure Tools: Failed to initialize Windows Azure storage emulator. 
Unable to start Development Storage. Failed to start Development Storage:
the SQL Server instance ‘localhost\SQLExpress’ could not be found.  
Please configure the SQL Server instance for Development Storage using 
the ‘DSInit’ utility in the Windows Azure SDK.

To fix it, install SQLExpress on your workstation. It is possible to point to a non-local instance of SQLExpress, but I am not elaborating it here.


Admin Mode:

Another error that you might encounter could be the following.

Windows Azure compute emulator must be run elevated.


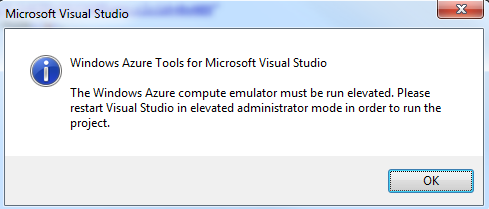
Fix it by running Visual Studio in administrator mode. Right click on Visual Studio icon and select "Run as administrator". Confirm windows warning message.


Posted in:

Tags: